Whilst I’ve spent a lot of time in the darkroom, I’ve always felt that my prints from black and white negatives, despite being stereoscopic, looked a bit ‘flat’; in the famous words of Chappell Roan, but more from a darkroom perspective, ‘I get the job done’, but the prints were dull, lacking something, and I wanted to improve them.
Previous uninspiring contact prints made using a phone-light for the exposure, a stereo negative from a Sputnik stereo camera, and guestimates for exposure times.
Thankfully, I knew exactly who to call on. Wendy Stone hails from generations of photographers. Based in Oxford, U.K., she makes stunning photographs using antique cameras and historic photographic processes, and you can often find her work in exhibitions. She has a beautiful studio near Folly Bridge, overlooking the River Thames, where she offers portrait and film developing sessions. I asked if she would make a special workshop for me to improve my prints, and we arranged a session on a hot sunny day in June, coinciding with Analogue Wonderland’s Big Film Photowalk, which gave me an excuse to also bring film cameras.
Wendy suggested we used f-stop contact printing with stereoscopic negatives, so I took developed 120 negatives I’d made both sequentially from a Rolleiflex camera, and instantaneously from a stereoscopic Rolleidoscop camera.

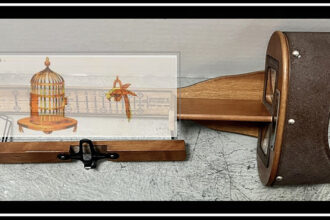
Obligatory indulgent photograph of two of my favourite cameras with examples of their stereo-negatives. The Rolleiflex (left) with its ‘Stereo Slide’ adapter, and the Rolleidoscop (right).
What is F-stop Printing?
F-stop printing is a technique used to finely control your print exposure in the same way you control the exposure of the original negative – by doubling or halving the ‘unit of exposure’. It was first popularised by Gene Nocon in his 1987 book ‘Photographic Printing’, and the idea is each unit of exposure lightens or darkens the print by the same amount, so you can quite accurately calculate how many units of exposure you need after you’ve made initial test strips to get the result you want. Instead of thinking of exposures in linear seconds, you think of them in f-stops. The technique allows you to control the exposure accurately by partial stops, and, thankfully, there are plenty of f-stop printing charts and guides online; these explain it much better than I can. Here are some recommendations for approachable online guides:
Why F-stop Printing?
My initial impression from f-stop printing with stereoscopic negatives was being amazed at how you could quite quickly and accurately refine your prints by using f-stops and then moving down to fractions to nail the exposure.
From Ian Whitney’s post on 35mmc, you can see another big advantage of f-stop printing is that if you find areas of a print from the negative need lightening or darkening (burning or dodging), you can make a mask and calculate from the test prints by how much of a stop you need to compensate to get a better print. For example, if the sky needs less exposure than the rest of the image, you can make a mask, and from your test prints, mask out the sky and add an additional exposure, for example, to the rest of the print for +1/2 stop. Then even if you change the base exposure, such as by using a different enlarger, or other variables, you can still figure out from the new base exposure and the chart how much time for the +1/2 stop you will need to add to the rest of the image after masking.
I don’t have the confidence yet to mask both halves from a small stereo print and get them good enough to work well in 3-D (however, I will try and just not mention it if it fails), but it means if you have a difference between exposures on the left and right halves of your stereo pair- such as changes in the camera settings or light between sequential photos, or, to an extent, if you have a stereo camera with different apertures on the left and right lenses (believe me and some of my crusty cameras, it does happen!), you can calculate the difference in f-stop printing fractions required to compensate for the difference in exposures. If you’re contact printing, you can mask half of the stereo pair after an initial exposure time, and then use an appropriate additional fraction of an f-stop of exposure; if you’re enlarging each half separately, you can just add an additional amount of time to the half of the stereo negative which needs it. Like for mono prints, the fraction of the f-stop calculated from the test prints will be the same no matter if the base exposure changes, you just check what it should be from the chart.
The biggest downside to f-stop printing is you need an accurate timer to be able to work in milliseconds; I’ve written an explanation below, because some timers will do the calculations for you, but they can be extremely pricey, and, whilst convenient, are not essential.
F-stop Contact Printing from Stereoscopic Negatives with Wendy Stone
After Wendy and I went through my negatives and made a selection, she prepared the darkroom chemicals for developing the prints. I must add here that you’ll have to forgive me for the lack of photos taken during the workshop; I enjoyed it so much and also didn’t want to ruin any prints in the darkroom, so taking photos wasn’t at the forefront of my mind.

Wendy Stone preparing the chemicals for developing the prints.
Wendy set up her beautiful Meopta Omepus II enlarger, and, as we were contact printing, not enlarging, she placed a clean piece of glass under the Meopta, ready to hold down the stereo negatives flat against the Ilford Ilfospeed pearl photographic paper we were going to use.

The enlarger setup, with the negative held against the photographic paper for the contact print, and a piece of cardboard ready to mask at different f-stops. You can just about see the Rayco timer near the top left. Note: it’s really important to keep good notes during the exposures (isn’t it Rebecca?!), so don’t forget your notebook. You can keep track of the f-stops used for the negatives and then go on to do your calculations, keeping a record of what works best for each negative.
By safe light the photographic paper and negatives were put in place; we initially used three stereo negatives at once on the photographic paper to save both time and paper, and so we could later fine-tune the required exposures for each negative afterwards. Wendy used her Rayco micro-electronic timer to make the initial test strips. If you refer to the chart below, and wanted to make the test strips by whole stops, you can see these could be 4s, 8s, and 16s. To do this, you can expose the whole print for 4s, then cover 1/3rd, expose for another 4s (4+4=8), then cover 2/3rds, and finally expose for 8s (8+8=16s), allowing each part of the test print to have an exposure increase by 1 stop.

Example of an f-stop printing chart.
We ran the print through the darkroom trays, and the timing of these will depend, for example, on the chemicals, the dilutions, and the paper you’re using, so I won’t go into details. There are plenty of guides online for general darkroom developing if you need help with any of it, there are some suggestions towards the end of this post on analogue stereoscopic photography.
We tried a few more different exposures, including at a different aperture of the enlarger’s lens, went through the test prints to find roughly the best exposures for each of the negatives, which had a nice balance between the shadows and the lighter areas, and then went on to refine them. This is where a darkroom timer which allows you to accurately measure 0.1s is required.


Test contact prints from stereo negatives.
Wendy’s Rayco micro-electronic timer was awesome, but it’s difficult to find good working examples. I’ve since found quite an inexpensive Chinese-manufactured electronic one online and ordered it. It has one socket you can apparently plug a safe light into, which remains on, and another socket for the enlarger, so you can press the pedal or button and it will switch on for the specific amount of time you set it to. In practice, however, the timer itself is very small and the sockets are right next to each other; I can’t fit both UK plugs into the timer at once as the gap in the middle is too small to accommodate them. The timer also came without instructions and no labels, so I had to figure out how to change the program to use milliseconds – give me a shout if you need help with this!

My ‘precision digital enlarger timer with foot switch’, which works well, once you’ve figured out how to work it, and as long as you don’t plug two things into it at once.
If you find a good-ish exposure for a print, for example between 8s and 16s, you can refer to the chart above and see there are 5 fractions of a stop between 8s and 16s, which you can make a further test print from; but how many fractions of a stop you use to refine the print’s exposure is entirely up to you, the more experienced you become, the more it becomes second-nature and you’ll have an idea where abouts the best exposure will be. There are very expensive timers which can calculate the fractions of a stop automatically for you, but I can’t afford them, so calculating the exposures is required; it’s good to keep a notebook handy!
Again, referring to the chart, you can see the stops between 8s and 16s (+1 stop) are:
- +1/6 stop: 1s; +1/3 stop: 2.1s; +1/2 stop: 3.3s; +2/3 stop: 4.7s; +5/6 stop: 6.3s.
So adding these to 8s will give you incremental fraction stop times (+8s) of:
- +1/6 stop: 9s; +1/3 stop: 10.1s; +1/2 stop: 11.3s; +2/3 stop: 12.7s; +5/6 stop: 14.3s.
To use these five fractions of a stop, you could:
- expose the whole print for 9s, then cover 1/5th, expose for 1.1s (9+1.1s, total=10.1s); cover 2/5th, expose for 1.2s (10.1+1.2, total=11.3s); cover 3/5th, expose for 1.4s (11.3+1.4, total=12.7s); cover 4/5th, expose for 1.6s (12.7+1.6=14.3s).
Sill awake? Amazing!

Wendy’s notes on the f-stop printing times and different negatives during the workshop.
Once you’ve made tests from the different fractions of a stop and selected the best exposure, you can then go on and make multiple prints using that optimum exposure time. After we’d made several prints, I left them in the final running water bath to rinse whilst I joined in the Big Film Photowalk in Oxford, lead by the Sunny 16 Podcast. Wendy, meanwhile, hung up the prints to dry once they had rinsed long enough, and she also tried my Rollei Stereo Slide to make her own stereo photos with her Rolleiflex (she has great taste in cameras!)


Prints drying in Wendy’s darkroom, and two final contact prints (note the Wheatstone bust taken with the Rolleidoscop will be cross-view as it is straight from the negative, untransposed).
A completely unnecessary inclusion, but you can see some of the results from one of my cameras on the Big Film Photowalk, a Nishika N8000, over on Tiktok:
After arriving back from the Photowalk, Wendy tried her hand at making instant stereoscopic photographs using a large-format camera adapted to accept a LomoGraflok Instant Back. Instead of moving the camera for the left and right exposures, she rotated the statue she was photographing and it worked well, creating a fabulous instant stereo with the most unusual equipment (you have to trust me on this despite the lack of photographic evidence).

Wendy Stone: Now a Stereoscopic Photographer ❤
All that was left for me to do was to cut and mount the prints we had made during the workshop, and I must say they really do look beautiful.


Making stereocards from the resulting prints.

A complete set of stereocards from Wendy’s first ever stereoscopic contact f-stop printing workshop.
Since the workshop, I’ve been buying bits of equipment when I can, including an enlarger from Secondhand Darkroom Supplies, and the timer I mentioned before. My plan is to create my own f-stop printing enlargements, and to crop them to put them in the stereo window, whilst keeping them a good size for viewing in 3-D; I’m just waiting for enough time to do so. You can see my Rolleidoscop will benefit from having the left and right halves of the stereo negatives printed at slightly different f-stop fractions because of a slight difference in apertures between the left and right lenses; I can now compensate for it with masking and f-stop printing instead of worrying about an expensive camera repair – although, knowing myself, I will probably still worry. I will also go on to try masking selective parts of a negative to burn or dodge areas, and see if I can be accurate enough for it to work well in 3-D.
As I still can’t shake off my scientific background, I enjoy the control and precision f-stop printing offers, as well as the immediate improvements I can see in my prints, and I can’t thank Wendy enough for teaching me the process.

Copyright © The Stereoscopy Blog. All rights reserved.
News
Berita
News Flash
Blog
Technology
Sports
Sport
Football
Tips
Finance
Berita Terkini
Berita Terbaru
Berita Kekinian
News
Berita Terkini
Olahraga
Pasang Internet Myrepublic
Jasa Import China
Jasa Import Door to Door